- Do's
- Don'ts
- What is First Aid Kit
- What is Artificial Respiration in First Aid & How to Work
- What is Personal Protection Equipment (PPE)
- General Rules of First Aid
- Types of injury and their prevention
- What is Necessary Treatments
- For Burns and Scalds: If a large area of the body is burnt, try to exclude the air by covering it with water, clean paper, etc. to relieve the pain.
- For Severe Bleeding: In case of severe bleeding the following immediate actions should be taken-
- What is Housekeeping
- What is Safety Signs
First aid is the provision of initial care for an illness or injury. It is usually performed by non-expert, but trained personnel to a sick or injured person until definitive medical treatment can be accessed. Certain self-limiting illnesses or minor injuries may not require further medical care past the first aid intervention. It generally consists of a series of simple and in some cases, potentially life-saving techniques that an individual can be trained to perform with minimal equipment.
or
When some mishappen takes place at a workplace or workshop and the human body gets damaged, then a certain procedure is to be followed before the arrival of a doctor or taking the person to the doctor, this procedure is called first aid. When a person suffers from electric shock certain mandatory Do’s and Do not’s should be kept in mind before providing first aid to the sufferer.
Do’s
- If possible, turn OFF the flow of electric current, remove the chord, switch OFF the home’s main line, etc. Because simply turning OFF an appliance may not stop the flow of electricity.
- If the current cannot be turned OFF, use a non-conducting object e.g., wood articles, or plastic articles to push the person away from the source of the current and if possible start on dry and insulating material to do so.
- If dry rope is available, without touching the sufferer, loop it around the feet or underarms and pull the sufferer free.
- If the person is faint, pale, and breathing normally then lay him down on a non-conducting surface with his head slightly lower than his body and legs elevated and cover him with a warm blanket or coat.
- If a person has a burn, remove clothing that comes OFF easily, and put the burned area in cool running water until the pain subsides. Then, gives first aid.
- If the injury is due to an explosion or fall then do not move the person because other severe injuries may be possible such as broken spine or backbone, etc.
- Once the person is away from the source of electricity, check the person’s airway, breathing, and pulse. If either has stopped start first aid.
Don’ts
- Do not touch the person with bare hands, if his/her body is still touching the source of electricity.
- Do not apply ice, butter, ointments, or medications to the burn.
- Do not remove dead skin, if the person has been burned.
What is First Aid Kit
The first kit is a collection of supplies and equipment, which need for injuries and temporary relaxation to the person.
Minimum First Aid and Facilities
Always keep a first aid kit with you, or available in your home, cottage, car, bot, workplace, and recreation areas. Store, it in a dry place and replace used or outdated contents regularly.
A first aid kit must contain the following equipment and matters.
- Emergency telephone numbers for EMS/9-1-1, your local poison control center, and your personal doctors (EMS stands for Emergency Medical Services).
- Home and office phone numbers for family members, friends, or neighbors, who can help you.
- Sterile gauze pads (dressings) in small and large squares to place over wounds.
- Roller and triangular bandages to hold dressings in place or to make an arm sling.
- Scissors, tweezers, and safety pins.
- Disposable non-latex gloves, such as surgical or examination gloves.
- Flashlight with extra batteries in a separate bag.
- Eye patches and thermometer.
- Barrier devices, such as pocket masks or face shields.
Necessary Instructions for First Aider
(i) The man who has met with an accident should be attained and given first aid to stop bleeding or kept in the proper position, in case some fracture is suspected. (ii) The doctor should be informed immediately.
(iii) Do not move the victim unless he is in danger of further injury. So, he should be at rest.
(iv) In case, there is respiration trouble with the victim, he should be given artificial respiration (discussed ahead).
(v) Do not leave the victim alone. (vi) If the man is to be carried to the hospital, then any
possible conveyance can be arranged. But it should be ensured that the victim is not disturbed.
First Aid to the Sufferer
After performing the above exercises, the following first aid must be given to the sufferer before help arrives.
1. Open the Airway
Place the hand on the sufferer’s forehead lift the chin with two fingers, tips, and gently till the head back to open the airway and clear any obstacles.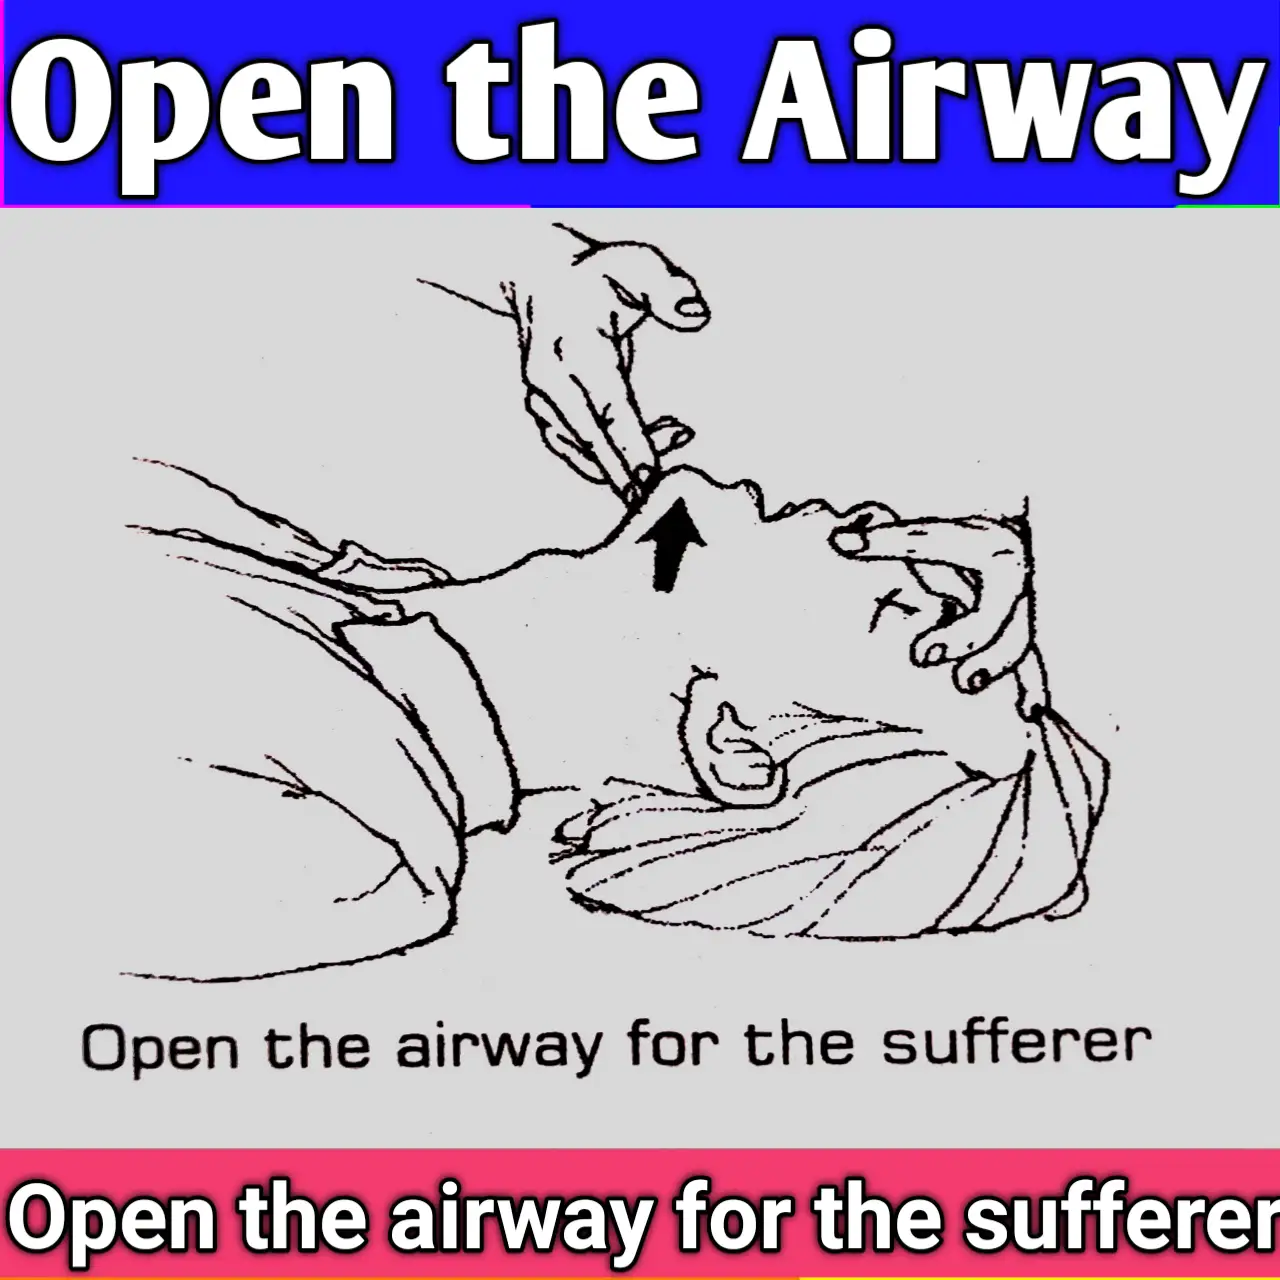
2. Look, Listen, and Feel for Normal Breathing
(I) Look for chest movement.
(ii) Listen at the sufferer’s mouth for breath sound.
(iii) Feel for air on your cheek.

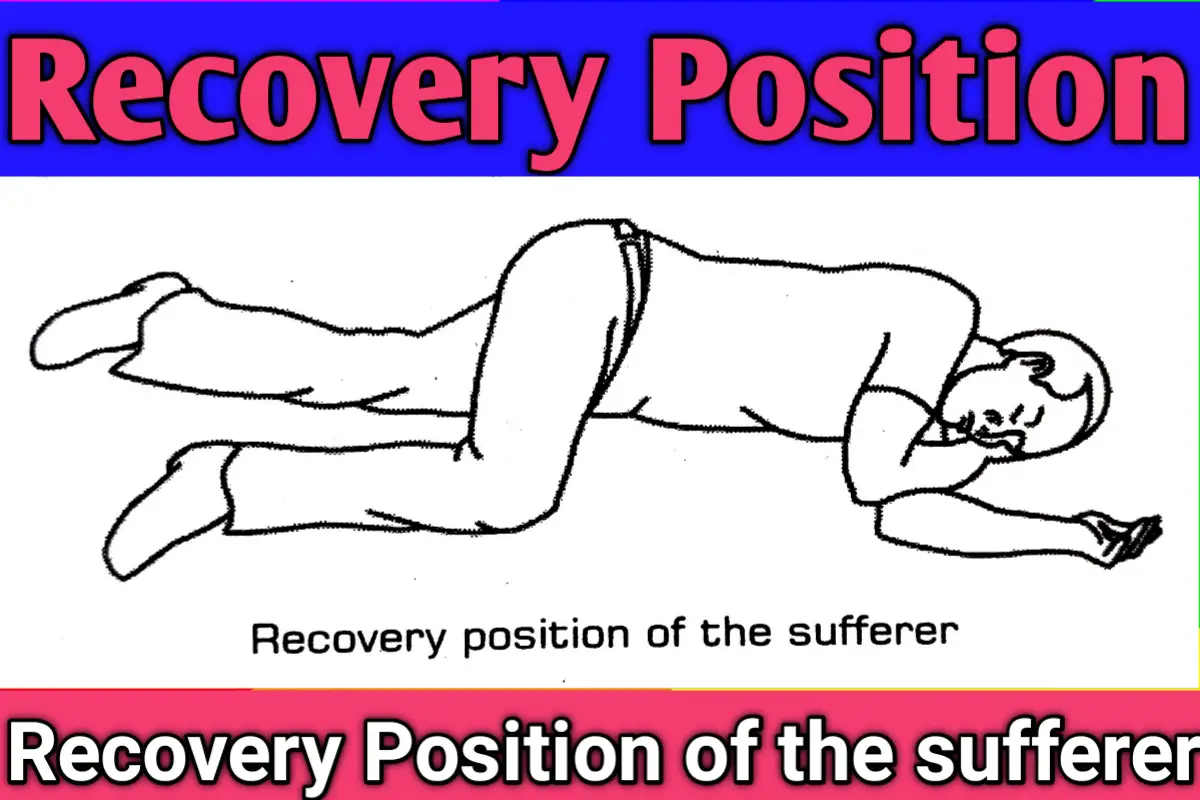
3. Recovery Position
If the sufferer is unconscious, but is breathing normally then, place in the recovery position.
If the sufferer does not resume spontaneous breathing after the airway is open, rescue or artificial breathing must be started. Be Calm! Think and act quickly! The sooner you begin rescue breathing, the more likely are to restore the sufferers breathing.
What is Artificial Respiration in First Aid & How to Work
Artificial respiration is the act of assisting or stimulating respiration, a metabolic process referring to the overall exchange of gases in the body by pulmonary ventilation.
Followings are the certain methods of artificial respiration
What is Sylvester’s Method of Artificial Respiration
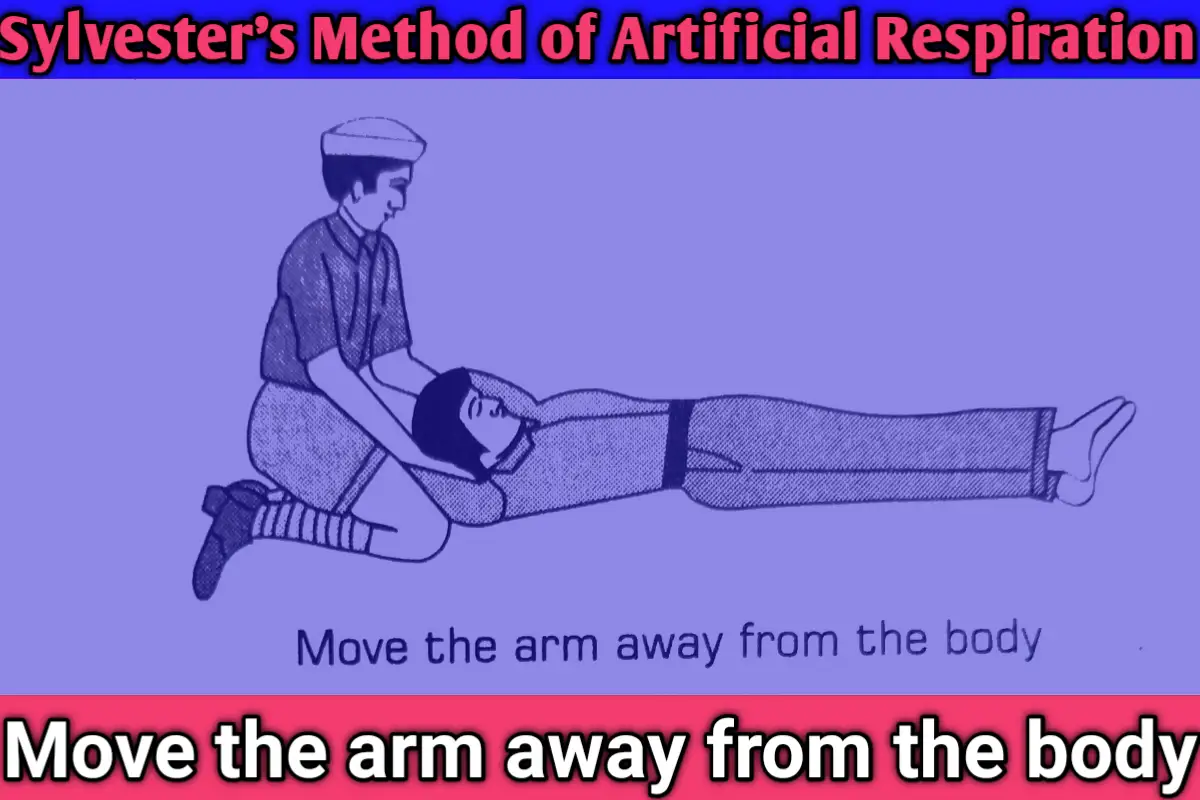
Step I Lay the person to be treated upon the back. Kneeling behind the head, seize each arm near the elbow and move them around horizontally, first away from the body, then over the head till they meet above, as shown in the figure. At that time, they should be given a steady pull for a few seconds.
By this means, the lungs are filled with air by drawing the ribs up and enlarging the capacity of the chest.
Step II In returning the arms to their former position alongside the chest, as shown in the figure. Making strong pressure against the lower ribs, driving the air out of the chest, and affecting expiration.
This process should be continued and repeated about 6 to 10 times per minute and not be abandoned until the sufferer breathes normally.

What is Schaffer’s Method of Artificial Respiration
Step I The sufferer should be laid on the abdomen. One arm extended directly overhead, the other arm bent at the elbow, and with face resting on the hand or the forearm, so that, the nose and mouth are free for breathing, as shown in the figure. The rusticator should kneel, pushing the sufferer’s hips with his knees just below his hip bone. The palms of the hands should be placed on the back with the fingers resting on the ribs, a little finger touching the lower rib, and a thumb along the side of the finger.

Step II With the arms held straight, the rescuer should swing backward slowly, so that, the weight of his body is gradually borne by the sufferer. The lower part of the chest and abdomen are compressed, and the air is forced out of the lungs. Step III Now, the rescuer should immediately swing backward in order to remove the pressure. Due to this, the chest will expand as pressure decreases and diaphragm descends and the lungs are supplied with free air. This process is repeated for 10 to 15 min, such that complete respiration is made in 4 or 5.

What is Mouth-to-Mouth Method
This method is accomplished by blowing air into the person’s mouth.
Step I Take a deep breath and place your mouth around the sufferer’s mouth, so that, your lips make a good seal against the skin of the sufferer.
Step II Blow two full breadths into the sufferer’s mouth around 1 to 1/2 second per breath, take a breath of fresh air each time before you blow.
Step III Watch for the chest to rise, if it is rising, sufficient air is getting into the sufferer’s lungs, if not then follow the steps again.

What is Mouth-to-Nose Method
(i) If the sufferer is unable to open their mouth due to certain reasons, then mouth to nose method is performed.
(ii) Mouth to nose method is performed in the same way as mouth to mouth method except that you blow into the nose, while you hold the lip closed with one hand.
(iii) Remove your mouth to allow the casualty to exhale passively.
(iv) This process is repeated 12-15 times in a minute.
(v) After giving these first aids, pers n should be taken to the hospital for a thorough medical checkup.
What is Personal Protection Equipment (PPE)
PPE refers to protective clothing, helmets, goggles, or other garments and equipment designed to protect, the wearer’s body from injury. The hazards addressed by protective equipment include physical, electrical, heat, chemicals, biohazards, and airborne particulate matter. The purpose of personal protective equipment is to reduce employee exposure to hazards when engineering and administrative controls are not feasible or effective to reduce these risks to acceptable levels.
PPE is needed when the will be hazards present. PPE has a serious limitation in that it does not eliminate the hazard at source and may result in employees being exposed to the hazard if the equipment is failed. Any item of PPE imposes a barrier between the user and the working environment. This can create additional strains on the wearer or user, impair their ability to carry out their work, and create significant levels of discomfort.
Good ergonomic design can help to minimize these barriers and to ensure safe and healthy working conditions through the correct use of PPE. Personal protective equipment can be categorized by the area of the body protected, and by the types of hazards and accessories. A single item may provide multiple forms of protection, eg., boots provide protection to the feet from chemicals, water, electric shock, etc.
5 Types of PPE
There are various types of personal protective equipment, which help us to protect ourselves in hazardous conditions. Some of them are as follows.
1. Respirators
Respirators serve to protect the user from breathing contaminants in the air, thus preserving the health of one’s respiratory tract. There are two main types of respirators. One type of respirator functions by filtering out chemicals and gases or airborne particles from the air breathed by the user. Gas masks and particulate respirators are examples of this type of respirator. The second type of respirator has protected the users by providing clear, respirable air from another source. This type of respirator includes airline respirators and self-contained breathing apparatus.
2. Skin Protection
Any form of PPE that acts as a barrier between the skin and the agent of exposure can be considered skin protection. Skin hazards, which lead to occupational skin diseases, can be classified into four groups.
(1) Chemical Agents
It can come into contact with the skin through direct contact with contaminated surfaces, deposition of aerosols, immersion, or splashes.
(i) Physical Agents
It consists of extreme temperatures and ultraviolet or solar radiation, which can damage the skin cover during prolonged exposure.
(ii) Mechanical Trauma
It occurs in the form of friction, pressure, abrasions, lacerations, and contusions.
(iv) Biological Agents
Biological agents such as parasites, micro-organisms, etc., have varied effects
when exposed to the skin. There are several items to protect the skin from getting damaged, such as gloves to protect the hands, protective clothing to protect the body, face shields to protect the face, etc.
3. Eye Protection
Any form of PPE that acts as a barrier between the eye and the agent of exposure can be considered as eye protection. Most eye injuries occur when solid particles such as metal slivers, wood chips, and or cement chips, get into the eye smaller particles in smooths and larger particles, such as broken glass also account for causing eye injuries. Blunt force trauma can occur to the eye when excessive force comes into contact with the eye.
The recommended usage of eye protection varies from one occupation to another occupation, and the provision of safety equipment can be generalized. Safety glasses provide the minimum protection from external debus and are recommended to provide side protection via a wrap-around design or via side shields. Goggles provide better protection than safety glasses. Full-face piece respirators are considered the best form of eye protection when respiratory protection is also needed.
4. Hearing Protection
Industrial noise is often overlooked as an occupational hazard, it is not visible to the eye. About 82% of occupational hearing cases occurred to workers in the manufacturing sectors. The occupational safety and health administration establishes occupational noise exposure standards. NIOSH (National Institute for Occupational Safety and Health) recommends that worker exposure to noise be reduced to a level of 85 dBA four-eight hours, to reduce occupational noise-induced hearing loss. PPE for hearing protection consists of earplugs and earmuffs.
5. Protective Clothing and Ensembles
This form of PPE is all-encompassing and refers to the various suits and uniforms worn to protect the user from harm. Entire sets of PPE, worn together in a combined suit would fall into this category. Below are some examples of personal protective equipment, worn together for a specific occupation or task to provide maximum protection for the user.
(i) Chainsaw Protection
It constitute of a helmet with a face guard, hearing protection, Kevlar chaps, anti-vibration gloves and chainsaw safety boots.
(ii) Underwater Driving Equipment
It constitutes equipment such as a diving mask, an underwater breathing apparatus, a diving suit/wet suit, and flippers.
(iii) Fire Fighters
PPE worn by firefighters includes bunker gear, self-contained breathing apparatus, a helmet, and safety boots as a pass device.
General Rules of First Aid
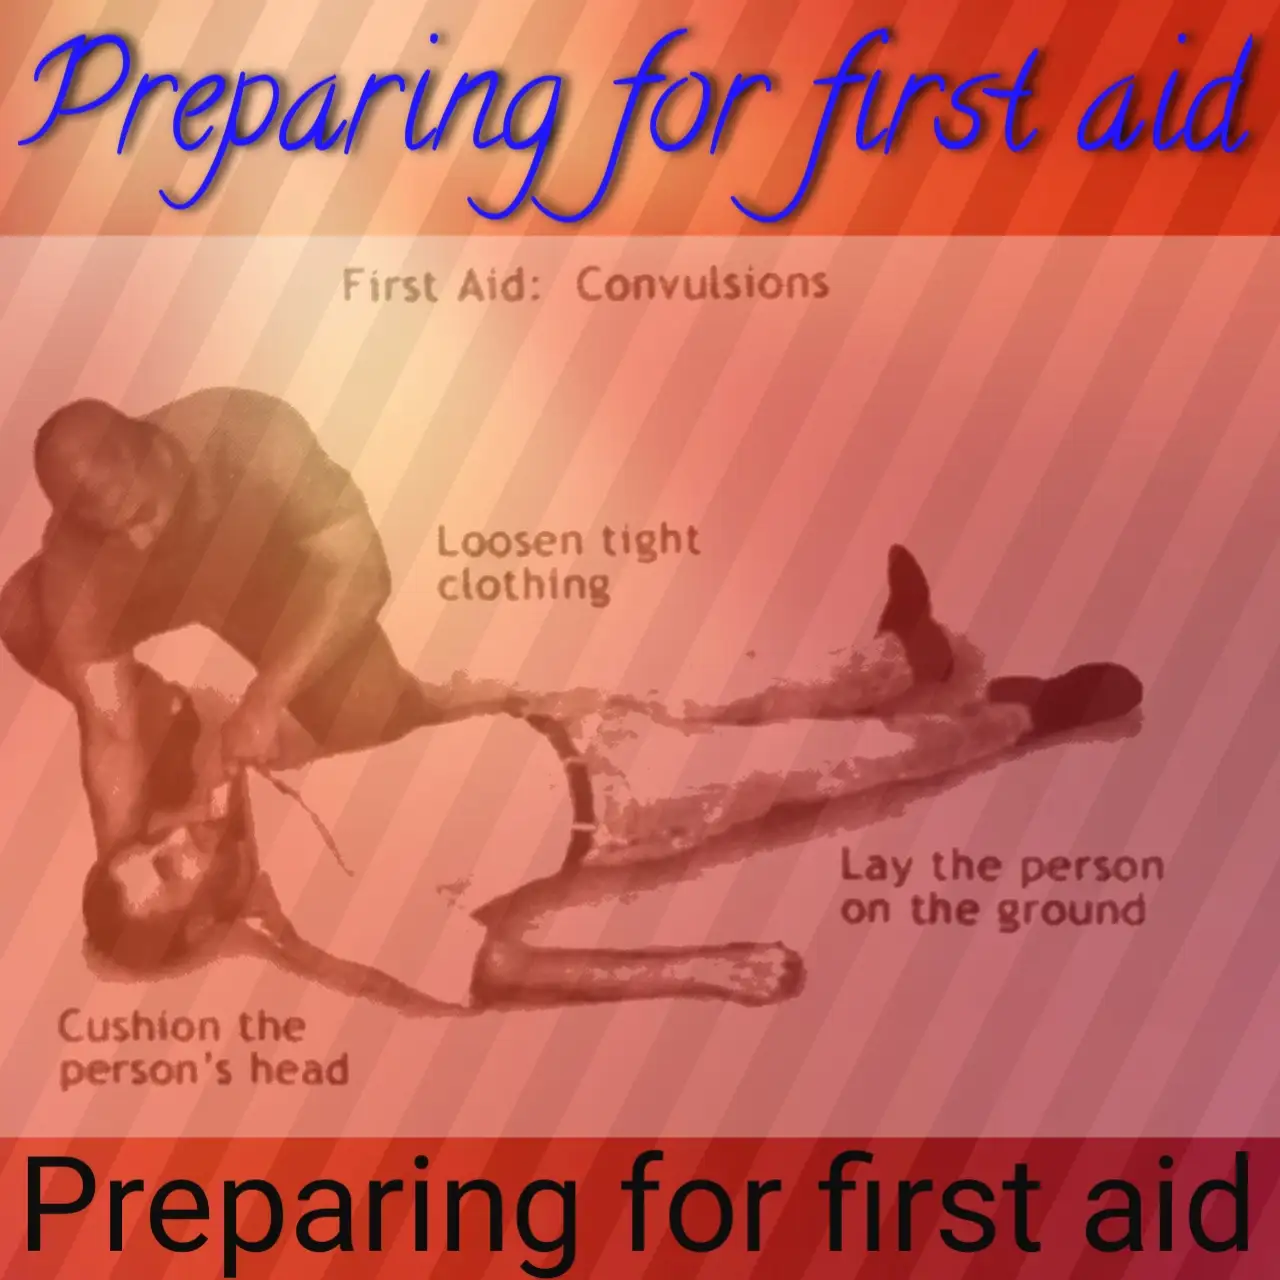
First aid includes mental help to the victim as well as treatment of the injury. Observe the following general rules.
- Use proper first aid for injury.
- Ask someone to call a doctor and an ambulance, if required.
- Please don’t move the victim unless he is in danger of further injury.
- Don’t leave the victim alone.
- Reassure the victim that he will be all right because a good mental attitude is necessary in case of an accident.
When you approach a seriously injured person, think of ABCs:
- A for Airway: Make sure the victim’s airway is not blocked by the tongue, secretions, or some foreign body.
- B for Breathing: Make sure the person is breathing. If not, administer artificial respiration.
- C for Circulation: Make sure the patient has a pulse. If no pulse is felt, administer cardiopulmonary resuscitation – CPR.
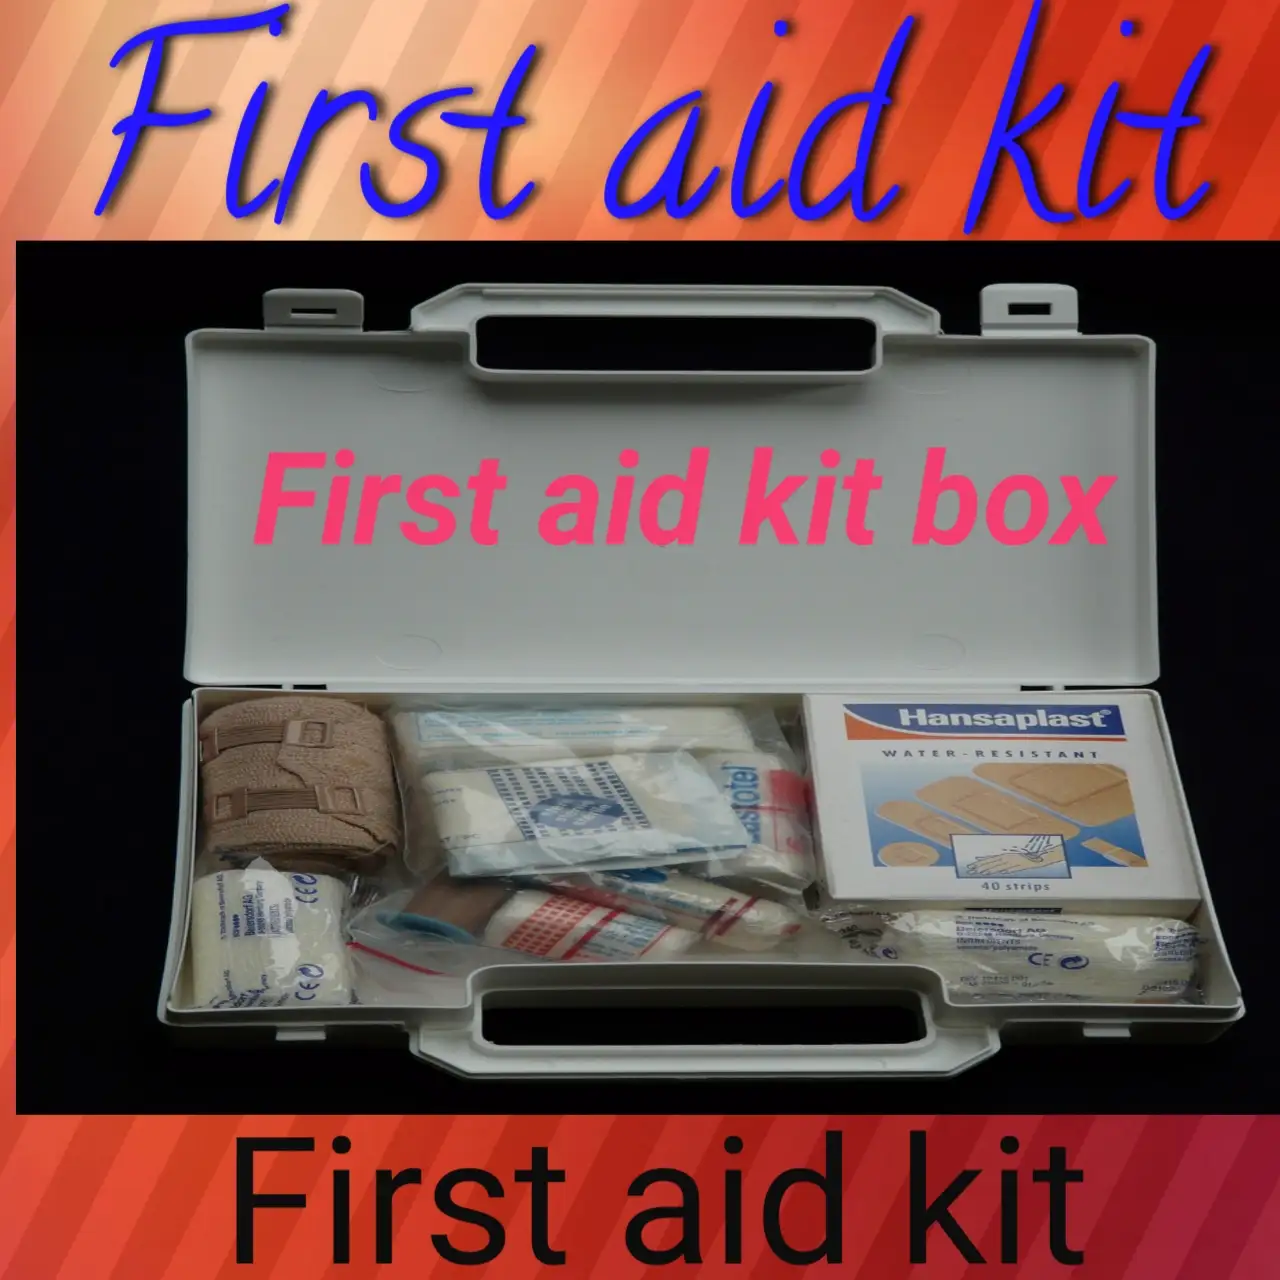
A first aid kit should comprise of:
- A box of twelve 100 x 100 mm sterile dressings, individually wrapped, for cleaning and covering wounds.
- Roll of gauze bandage, 50 mm wide, for bandaging sterile dressings over wounds, etc.
- At least three roller bandages 75 mm x 5 m. Three squares of 1 m x 1m to make triangular bandages or slings. Supply of safety pins 40 mm long to hold the triangular bandages in place.
- Two wooden splints.
- Box of assorted dressings [Band-aid, Curad, or similar products].
- Two rolls of adhesive tape, 25 mm and 50 mm wide.
- Roll of absorbent cotton.
- Tube of petroleum jelly.
- Tube of antibiotic salve.
- Bottle of calamine lotion, for sunburn, insect bite, rashes, etc.
- Bottle of ipecac syrup to induce vomiting.
- Box of baking soda [bicarbonate of soda].
- Pair of scissors.
- Pair of tweezers.
- A packet of needles.
- Sharp knife.
- Medicine (eye) dropper.
- Measuring cup.
- Oral thermometer.
- Rectal thermometer.
- Hot-water bottle.
- Ice bag.
- Box of wooden safety matches.
- Flashlight with fresh batteries.
Types of injury and their prevention
- Cuts and Abrasions: These are generally caused by rough surfaces and jagged edges, splinters, and pointed projections. Leather gloves should be used for protection from cuts and abrasions.
- Crushing of Feet or Hands: To prevent crushing of feet, safety shoes with steel toes can be used. Timber wedges can be used while raising and lowering heavy loads to prevent the crushing of hands.
What is Necessary Treatments
For Burns and Scalds: If a large area of the body is burnt, try to exclude the air by covering it with water, clean paper, etc. to relieve the pain.
For Severe Bleeding: In case of severe bleeding the following immediate actions should be taken-
- Make the victim lie down and rest.
- If possible, the injured part of the body should be raised above the level of the body.
- Pressure should be applied to the wound.
- Ask for assistance, if required
When the bleeding has stopped, dress the wound and cover it with a pad of soft material.
For Large Wounds: Use a clean pad and bandage firmly in place. In case of severe bleeding use more than one dressing.
For Electrical Burns: Do not try to waste time applying first aid to the burns until breathing has been restored and the victim can breathe normally unaided.
What is Housekeeping
Good housekeeping means safe storage of tools, components, parts, and all the items needed in the workshop. Important general rules for good housekeeping are:
- The shop floor should be kept clean of grease, oil, or any other liquid, which may make the floor dirty and slippery.
- Tools etc. should not be left around on the table or on the bed of the machine.
- Tools should be kept away in the proper place when not required.
- Gangways should be kept clear of everything.
- Scrap should be thrown only in the scrap boxes.
Some of the important benefits of good housekeeping are:
- Reduction in fire hazards. Poor housekeeping accelerates the outbreak and spread of fire.
- Higher employees’ morale. Clean surroundings and freedom from injury improve employees’ attitudes and productivity.
- Reduction in obstructions. Good housekeeping ensures that obstructions to production such as excess material, tools, scrap, etc. are removed. When production lines are orderly and free from obstructions, work goes on smoothly, and an increase in production is guaranteed.
- Reduction in operational costs. Once the work area has been cleaned and good housekeeping put in place, operational time and money are saved.
What is Safety Signs
Safety signs warn us of the possible danger and they must not be ignored. These signs can be recognized by their shape and color. Generally, the safety signs fall into the following four basic categories
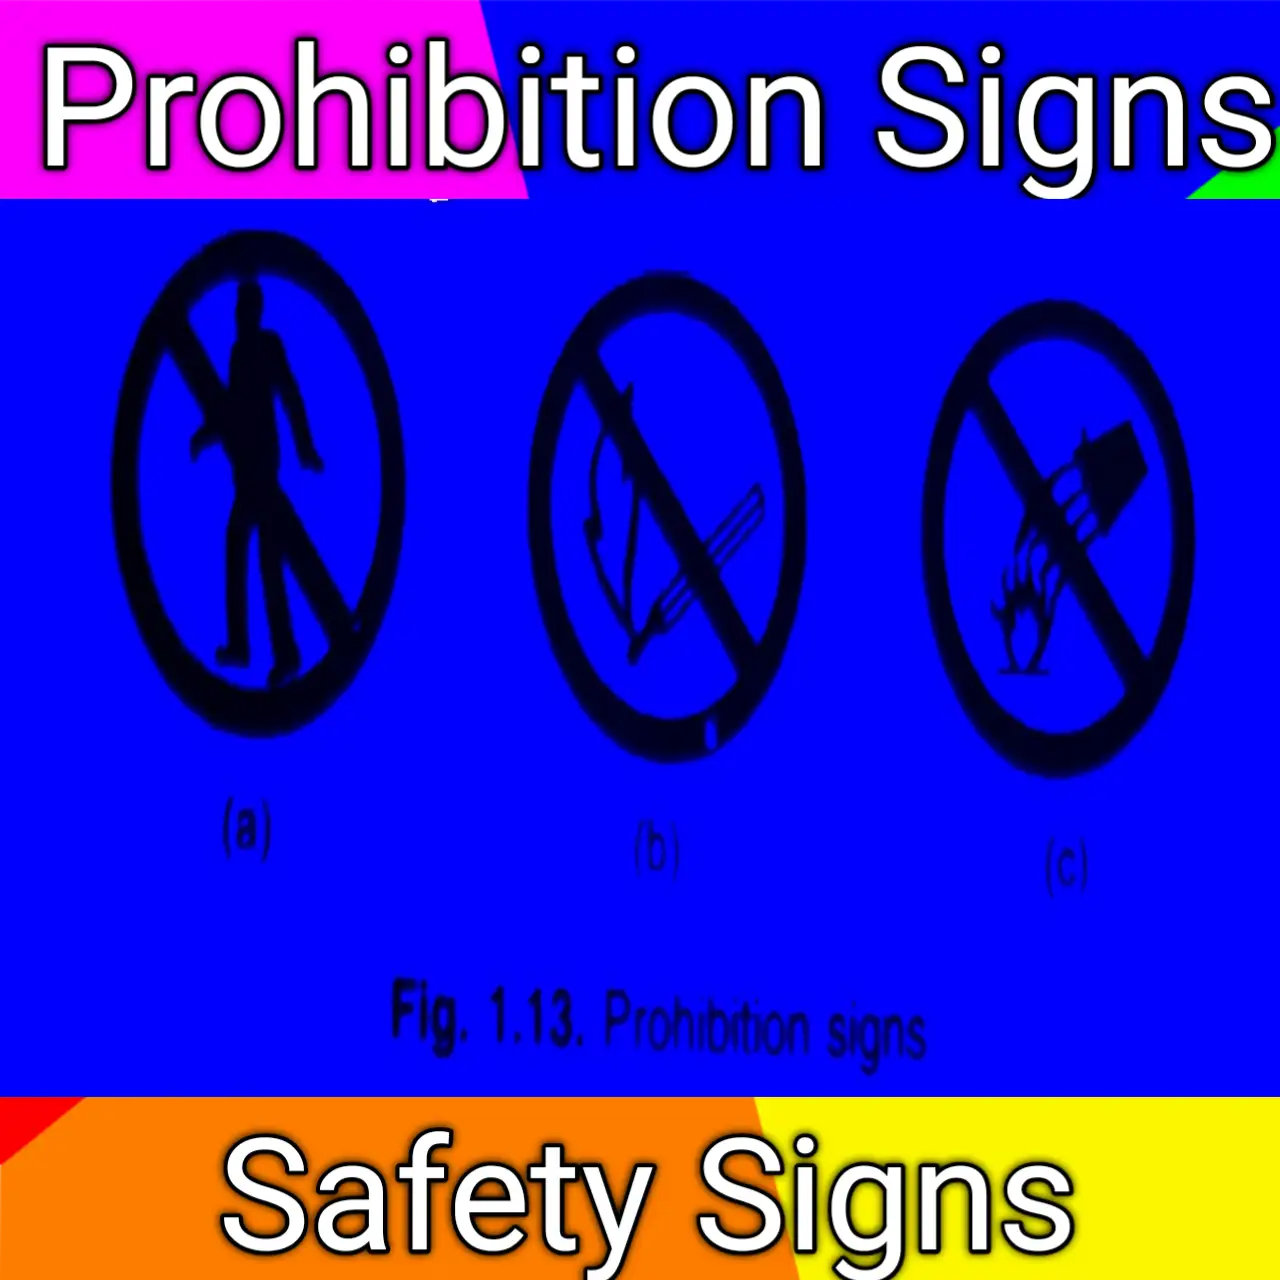
What are Prohibition Signs:
These signs are circular in shape having a red border and crossbar, black symbol on white background.
Examples:
- Pedestrians prohibited [Fig. 1.13(a)].
- Smoking and naked flames are prohibited [Fig. 1.13(b)].
- Do not extinguish with water [Fig. 1.13(c)].
What are Mandatory Signs:
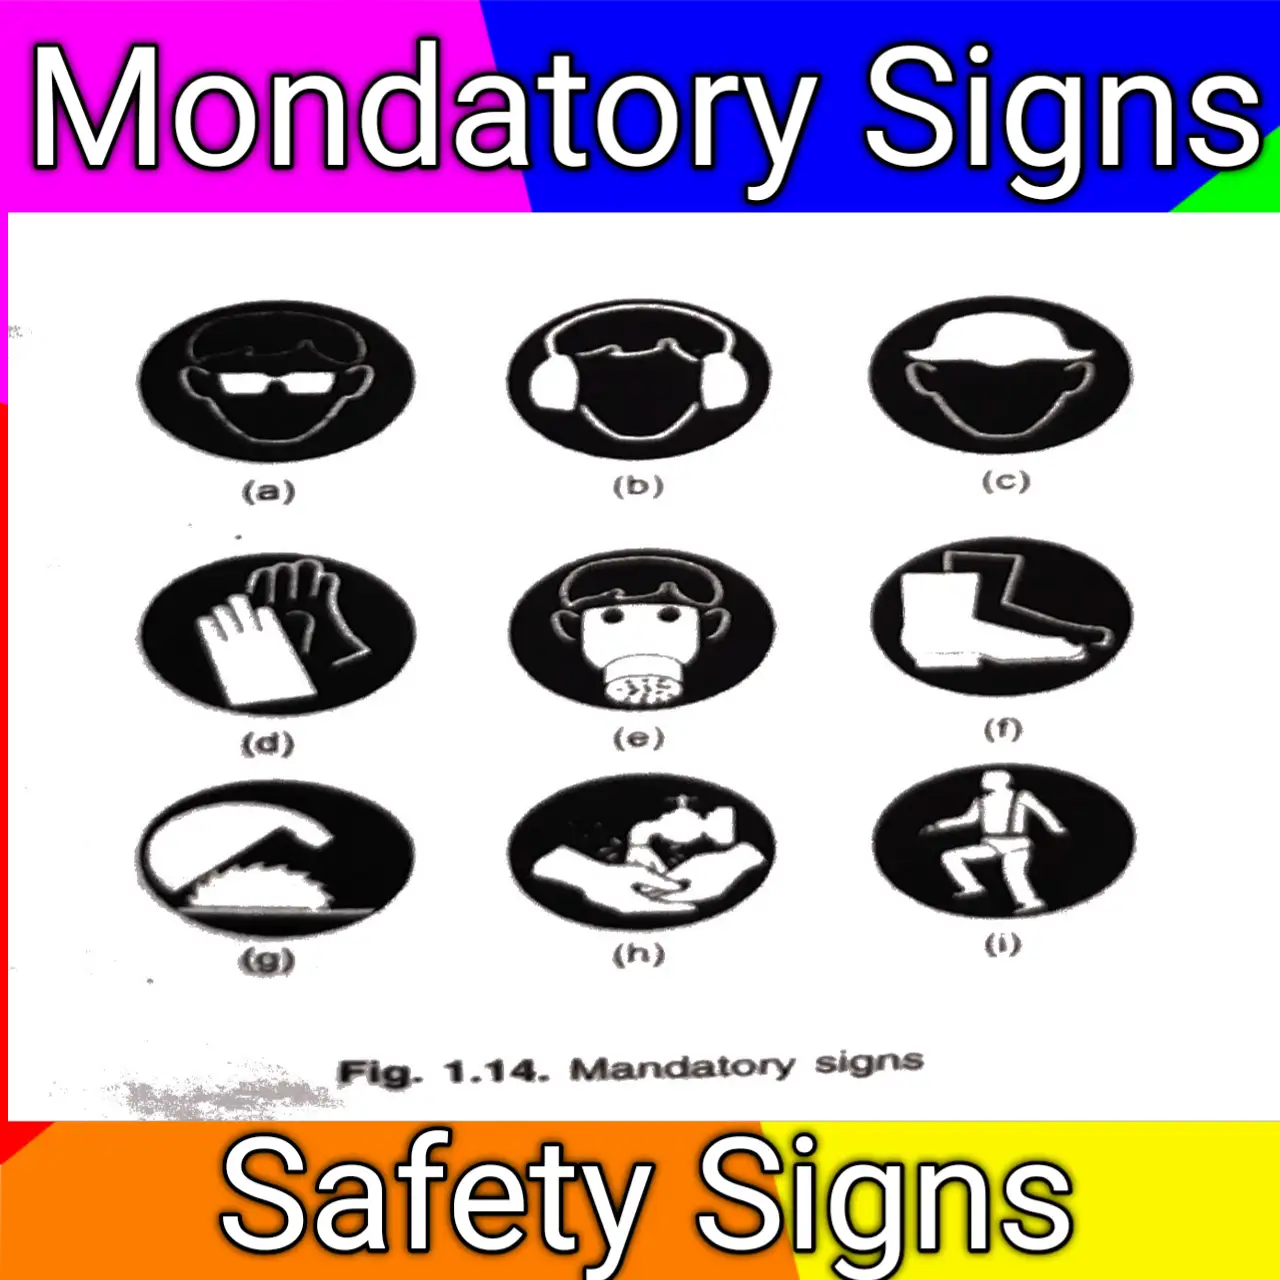
These signs are circular in shape having white symbols on blue background.
Examples:
- Wear eye protection [Fig. 1.14(a)].
- Wear hearing protection [Fig. 1.14(b)].
- Wear head protection [Fig. 1.14(c)].
- Wear hand protection [Fig. 1.14(d)].
- Wear a respirator [Fig. 1.14(e)].
- Wear foot protection [Fig. 1.14(f)].
- Use an adjustable guard [Fig. 1.14(g)].
- Wash hands [Fig. 1.14(h)].
- Wear a safety harness belt [Fig. 1.14()].
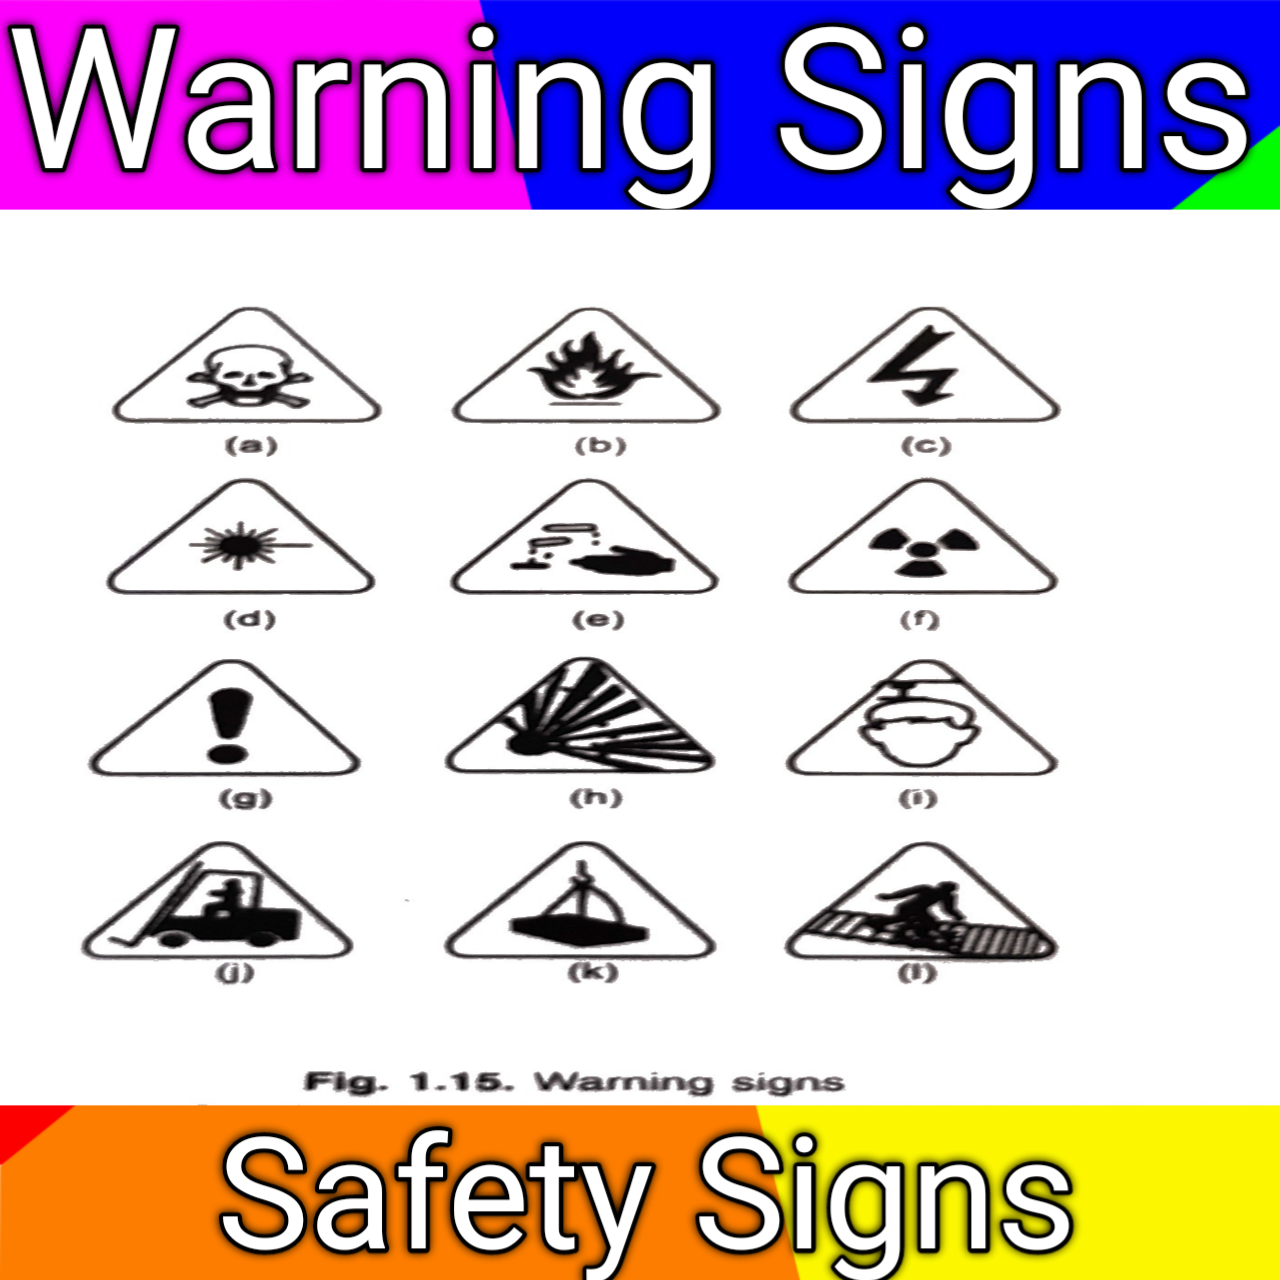
What is Warning Signs:
These signs are triangular in shape having a yellow background with a black border and symbol.
Examples:
- Toxic hazard [Fig. 1.15(a)].
- Risk of fire [Fig. 1.15(b)].
- Risk of electric shock [Fig. 1.15(c)].
- Laser beam [Fig. 1.15(d)].
- Corrosive substance [Fig. 1.15(e)].
- Risk of ionizing radiation [Fig. 1.15()].
- General warning risk of danger [Fig. 1.15(g)].
- Risk of explosion [Fig. 1.15(h)].
- Overhead (fixed) hazard [Fig. 1.15(0)].
- Forklift truck [Fig. 1.15()].
- Overhead load [Fig. 1.15(k)].
- Fragile roof warning signs [Fig. 1.15(0)].
What is Information Signs:
These signs are square in shape having a white symbol on green background Examples:
First aid point (Fig. 1.16).
