- What is marking tools in workshop
- What is Marking off Table ( Layout Table )
- What is a Surface Plate (Marking Tools in Workshop)
- What is an Angle Plate? 3 Types of Angle Plates, Uses, & Grades. (Marking Tool in Workshop). iti fitter marking tools
- What is V-Block? 4 Types of (BIS) V-Block, Uses, Purposes for Machining, and Marking Tools in Workshop. ITI Fitter Marking Tools
- What is Scriber Use, and Types? ITI fitter marking tools
- ITI Fitter Marking Tools. What is a Divider? Types of Divider, Size on Marking Tools.
- ITI Fitter Marking Tools. What is Trammel? Uses, Workshop Marking Tools.
- What is Jenny Caliper? Types of Jenny Caliper on Marking Tool. ITI fitter marking tools
- What is a Scratch Gauge? Uses of Scratch Gauge on Marking Tool, Best of workshop.
What is marking tools in workshop
Marking tools in a workshop are instruments used to make accurate and clear markings on workpieces. These tools are essential for indicating measurements, guidelines, or specific points during various manufacturing processes. Common marking tools include rulers, scales, calipers, squares, scribers, and marking gauges. These instruments help ensure precision and consistency in layout and measurement, facilitating accurate cuts, drills, and other operations in metalworking, woodworking, and other manufacturing tasks.
Marking is a complex process and this is done by different types of tools and processes.

What is Marking off Table ( Layout Table )
A marking-off table ( marking table ) is used as a reference surface for marking workpieces.
The top surface of the marking of the table is made up of cast iron. It is rigid and accurately finished. It has a planned long surface and a metal stand. Its edges are at 90°. The marking table provides a reference plane on which the work and marking tools lie.
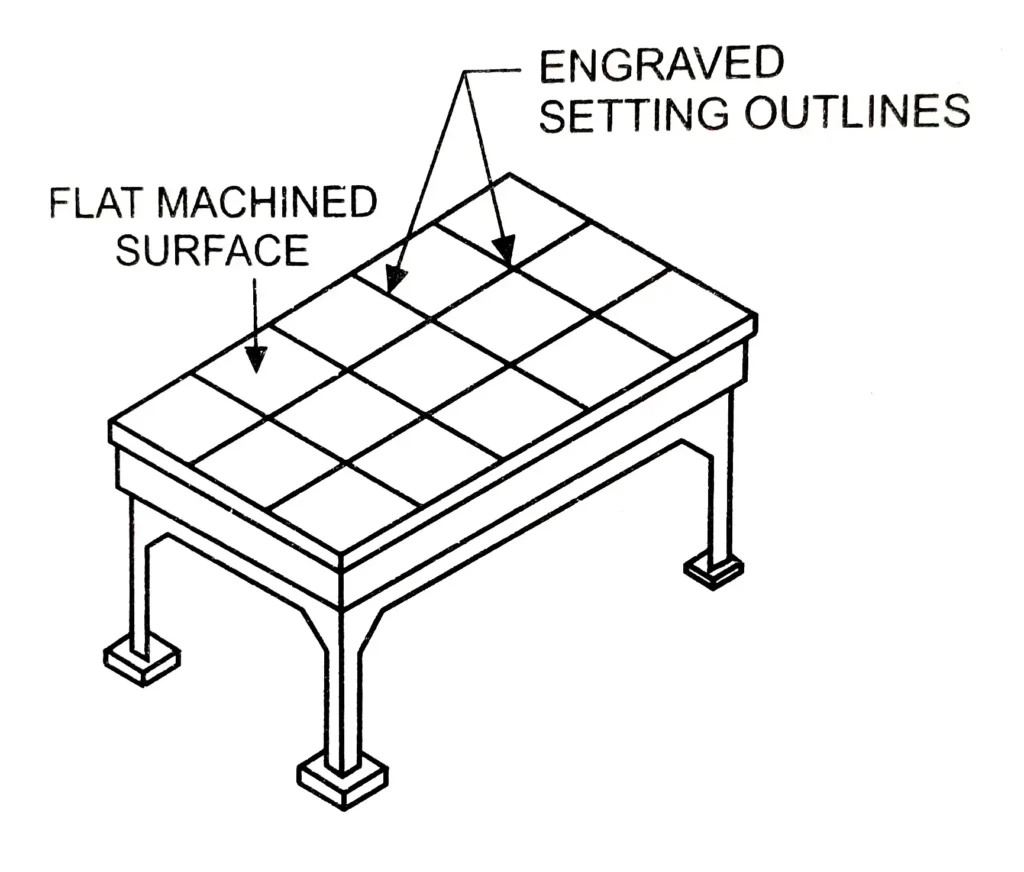
This table should be protected by a well-fitting wooden cover. These tables are also used for setting measuring instruments and for checking sizes, parallelism, and angles.
Precautions while Using Marking Off Table
(i) A marking of the table is very precise as a piece of equipment and should be protected from damage and rust.
(ii) After use, the marking table should be cleaned with a soft cloth.
(iii) The surface of the marking table made up of cast iron should be protected by applying a thin layer of oil.
What is a Surface Plate (Marking Tools in Workshop)
It is generally square or rectangular. It is made up of cast iron, granite, etc. Its upper surface and sides are made accurate by scraping. A surface plate is used by placing it on the top of the table. It is used to test the flatness of other surfaces or to provide a truly flat datum surface in marking off.
Based on the material used, the surface plates can be classified as
(i) Cast Iron Surface Plate
It is generally made up of grained cast iron with two handles on its sides. A frame is cast with the iron surface plate to keep away the surface from the table.
Its upper surface is very accurate and made up of scraping and machining. Its accuracy is classified into grades such as A-grade surface plate is used for marking with the precision instrument by placing the job over the surface plate. It is also used for setting and measuring purposes. The accuracy of the A-grade is 0.005 mm and the B-grade plate has 0.02 mm accuracy which can be tested by dial test indicator.
It is always placed at some height or on the marking-off table so that the worker can perform work easily. All sides are assumed true for marking purposes. It is used
(a) to find out the accuracy of the flatness of the job.
(b) to the marking of the job and to stay the implements and tools.
(c) to find out the accuracy of the try square.
(d) to measuring of complex measurement of a job
(ii) Granite Surface Plate
It is made up of granite, which is a hand stone and its upper part shows good finishing. It is brittle due to its hardness and porn to fall. According to work, it is available in different sizes.
(iii) Glass Surface Plate
Its surface made up of glass is 4 to 8 microns and is available in 50 to 90 cm in the form of a square. It is lightweight so that, easily movable from one place to another. Its surface hardness is high so, surface finishing presents for a long time. It is not used in punching operations and is also not affected by the environment.
Based on the applications, the surface plate can be classified as
(i) Inspection of Surface Plate
In the workshop, the plate that is used to inspect the size of parts is known as the inspection surface plate. It is used occasionally, therefore its accuracy lasted for a long time. Its surface finishing is 2.5 microns and is used to inspect the workshop surface plate.
(ii) Workshop Surface Plate
This plate is used in workshops for generally all types of work. Its surface finishing varies from 1 to 25 micron.
(iii) Master Surface Plate
This surface plate is used in the factory that builds the surface plate. Its surface finishing is high (i.e., 1 to 25 microns) so that, it is used to make more accurate surfaces.
What are Marking Tools in the Workshop, and what Advantages of Surface Plate
(i) Low coefficient of expansion and thermal stability.
(ii) Water absorption and porosity are low and hence long-term dimensional stability is good.
(ii) It is fine-grained and the density and hardness are suited for dimensional metrology.
(iv) Flexural strength, compressive strength, modulus of rupture, and tensile stress.
(v) corrosion-free, granite does not rust nor corrode or react chemically with other substances.
(vi) Non-magnetic and non-conductive.
(vii) Ideal for guideways for measuring instruments and air-bearing surfaces.
Precautions while Using Surface Plate (Marking Tools in Workshop)
(i) It should be properly covered with a wooden cover. It should be cleaned of dust particles during operation.
(ii) Never strike on the surface plate, even marking the center with the center punch spoils the top surface of the surface plate.
(iii) Never rub unfinished or rough jobs on it, otherwise it will make scratches on the surface.
(iv) After using, it should be properly cleaned, oiled, and covered with dust cover.
(v) Never put the hot job on the surface plate.
What is an Angle Plate? 3 Types of Angle Plates, Uses, & Grades. (Marking Tool in Workshop). iti fitter marking tools
An angle plate is made up of cast iron or steel and machined accurately to an angle of 90°. Angle plates are used to support the job and to provide a vertical or angular plane for marking.
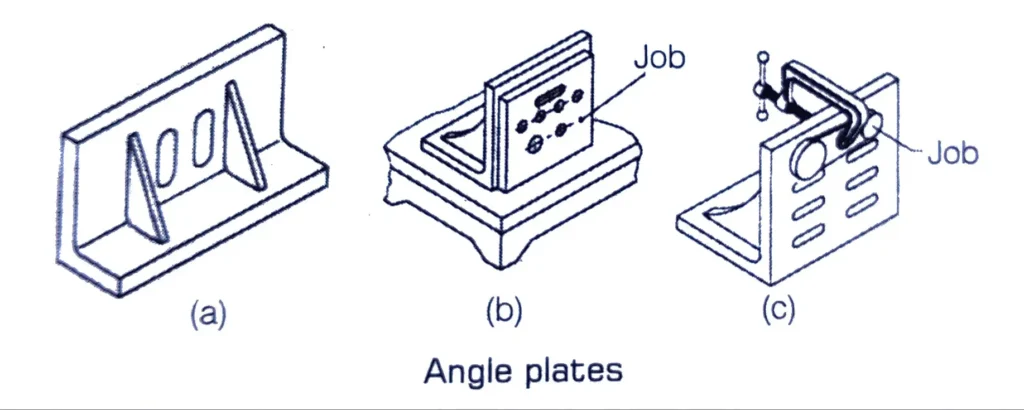
In some types, long slots are made to fix the jobs with bolts and nuts. Angle plates can be used to support jobs at different angles. Angle plates are also used to set jobs on the machines.
Angle plates can be classified into different types
(i) Solid Angle Plate or Fixed Angle Plate
This angle plate is the most common. It has two plane surfaces perfectly machined at 90° to each other. Such angle plates are suitable for supporting workpieces during layout work. They are comparatively smaller in size. Slots are provided to clamp the workpiece and to reduce the weight.
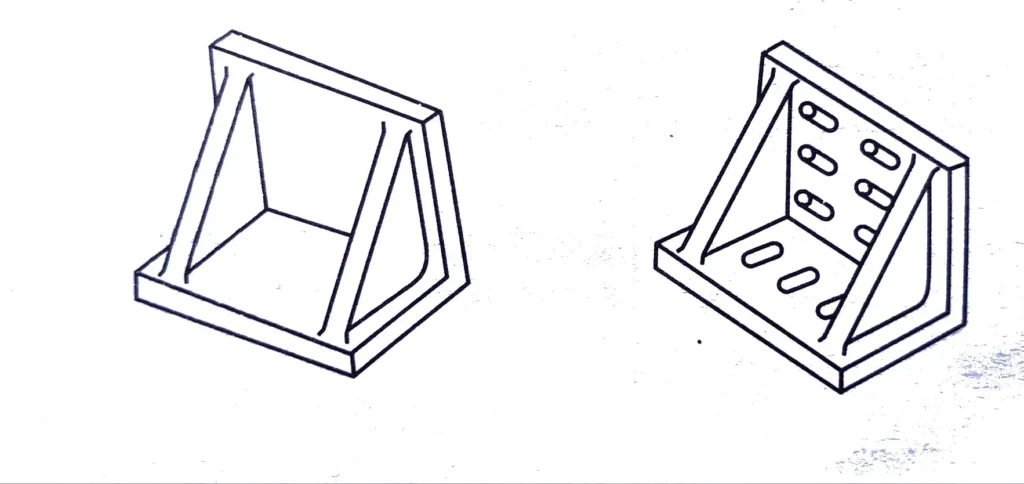
(ii) Adjustable Angle Plate
This angle plate is available to support jobs at different angles. Calibrations are done on it to set the job at a particular angle. Slots are provided on it to clamp the job by clamping bolts. These are available in Grade-I and Grade-II.

(iii) Box Angle Plate
These plates have applications similar to those of other angle plates. After setting, the work can be turned over with the box enabling further marking procedure. This is a significant advantage. This plate has all the faces at 90° to each other.
Angle plates should be carefully handled and maintained. Any nick or scratches can spoil the accuracy of the angle plates.
What is V-Block? 4 Types of (BIS) V-Block, Uses, Purposes for Machining, and Marking Tools in Workshop. ITI Fitter Marking Tools
V-blocks are used to hold the cylindrical or circular object for marking and setting the work on the machines. The clamp is used to fix the job tightly in the V-block for machining purposes. V-blocks are finished with high accuracy in respect of dimension, flatness, and squareness.
(i) Single Level Single Groove V-Block
(ii) Single Level Double Groove V-Block
(iii) Double Level Single Groove V-Block
(iv) Matched Pair V-Block
Different types of V-blocks are available. As per (the BIS Bureau of Indian Standard). There are four types of V-blocks
(i) Single Level Single Groove V-Block
This type has only one V-groove and has a single groove (slots) on either side. These grooves are used for accommodating the holding clamps.
(ii) Single Level Double Groove V-Block
This type will have one V-groove and two grooves (slots) on either side for clamping in two positions.
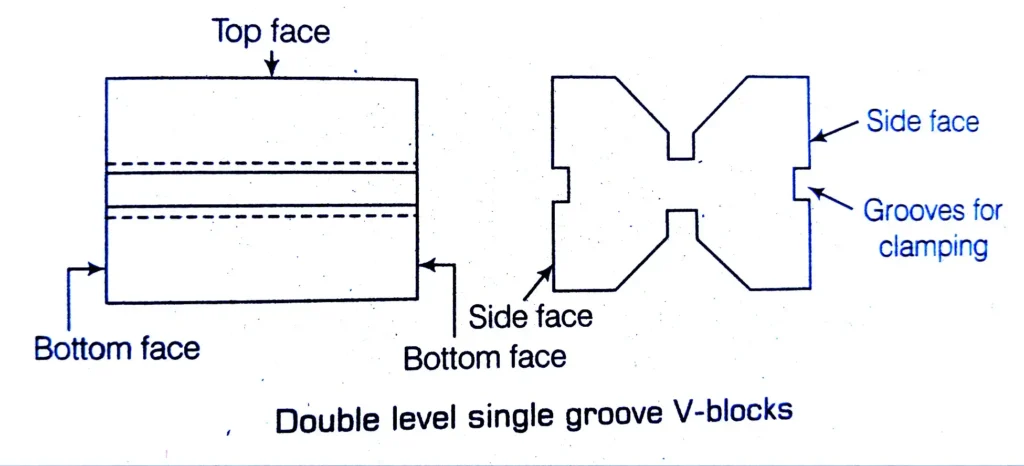
(iii) Double Level Single Groove V-Block
In this case, the V-blocks will have two V-grooves on the top and bottom. A single groove for clamping on either side.
(iv) Matched Pair V-Block (Marking Tools in Workshop)
These blocks are available in pairs that have the same size and the same grade of accuracy. They are identified by the number or letter given by the manufacturer. These sets of blocks are used for supporting long shafts.
Grades and Materials in V-Blocks (Marking Tool in Workshop)
V-blocks are available in grades A and B for V-blocks, which are discussed as follows.
(i) Grade A These are more accurate and available only up to 100 mm in length. They are made up of high-quality steel.
(ii) Grade B These are not as accurate as the ones in grade A. These blocks are used for general machine shop work.
These blocks are available up to 300 mm in length. These V-blocks are made up of closely-grained cast iron.
Clamping Devices for V-Blocks, (Marking Tool in Workshop)
U-clamps are provided for holding cylindrical job families on V-blocks.

Designation of V-Blocks
Marking tools in workshop V-blocks are designated by the nominal size (length) and the minimum and maximum diameter of the workpiece capable of being clamped to the grade and the number of the corresponding BIS standard (Blocks as per Indian Standard). In the case of matching pairs, it should be indicated by the letter M. For V-blocks with clamps, it should be indicated with clamps.
What is Scriber Use, and Types? ITI fitter marking tools
Marking tools in the workshop in layout work, it is necessary to scribe lines to indicate the dimensions of the workpieces, to be filed or machined. It has a single conical point and a knurled body. A scriber is a tool used for marking.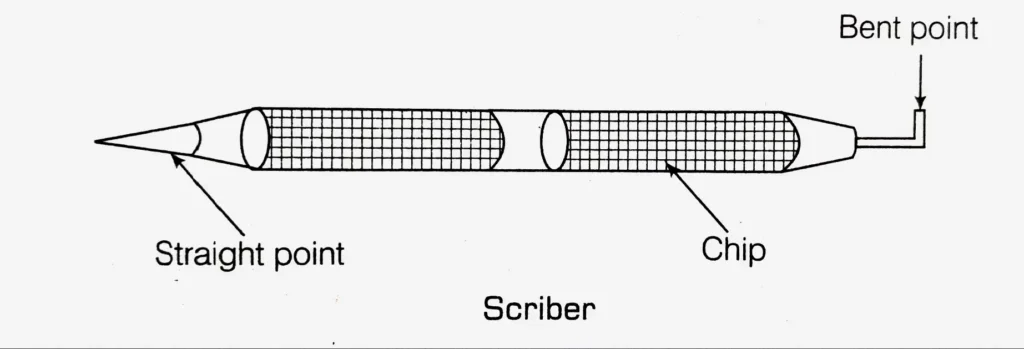
It is made up of high-carbon steel which is hardened. It must be held at an angle, inclined towards the direction of movement. Scriber points are very pointed and they should be handled carefully.
Scribers are available in different shapes and sizes. The one most commonly used is the plain scriber.
While scribing lines, the scriber is used as a pencil so that, the lines drawn are close to the straight adage. The point of the scriber should be ground and honed frequently to maintain its sharpness.
(i) Bent Scriber
One end is straight and the other is bent at 90ο but both are pointed. Straight sides are generally used to draw lines and bent head is used for internal marking on the job surface.
(ii) Adjustable Scriber
This type of scriber’s length can be increased or decreased according to need. It contains an empty sleeve which carries knurling in outside parts. The wire of the scriber goes inside the sleeve with the help of a nut.
(iii) Straight Scriber
This is a straight scriber in which one part is straight and printed and the other part is not bent. This is used for simple marking and is not used for marking inside of the job. 
(iv) Offset Scriber
An offset scriber is a part of many measuring instruments. eg. Vernier, height gauge, square head. It is used for accurate marking. Its endpoint is very sharp as a knife so, it is also called a knife scriber.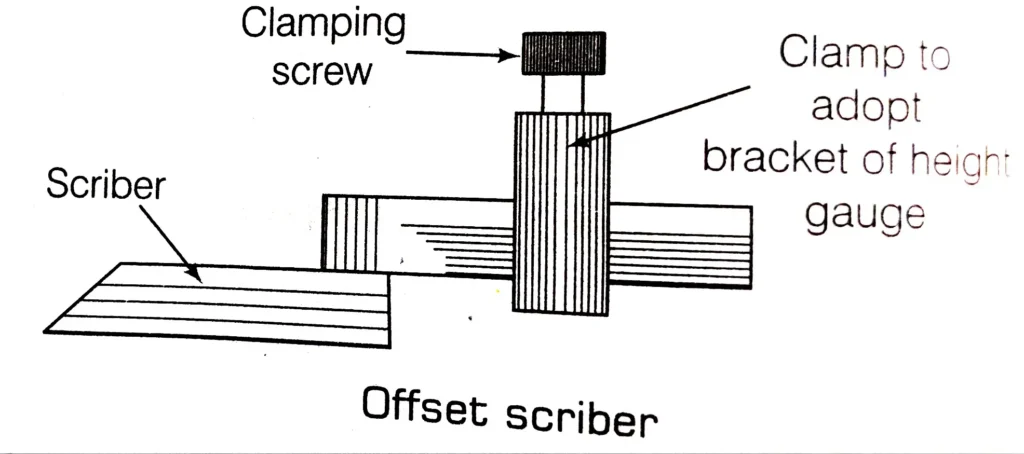
Marking Tool in Workshop Precautions while Using Scriber
Marking tools in the workshop using
(i) Scriber points are very sharp and must be handled carefully.
(ii) Do not put the scriber in your pocket.
(iii) Place a cork on the point when not in use to prevent accidents.
ITI Fitter Marking Tools. What is a Divider? Types of Divider, Size on Marking Tools.
It is a marking tool. Both legs are straight and pointed as a scriber. It is used for drawing a circle or arc on a job and for dividing the line into equal parts. It is available in firm joint and spring types.
It is available in different sizes ie., 50, 75, 100, 150, and 200 mm, etc. It is made up of high-carbon steel and mild steel. The carbon steel divider is done hard and tempered while the mild steel divider is case harden.
(i) Rivet Type Divider
The legs of this divider are attached with the help of a rivet and a washer is placed between them. It is opened or closed by applying force on its legs and if the joints are looser then by using the hammer, it is tightening.
(ii) Spring Type Divider
It is similar to a rivet-type divider but both legs have an upper joint attached to the spring.
ITI Fitter Marking Tools. What is Trammel? Uses, Workshop Marking Tools.
It is used for marking a big circle, arc, and other marking. It has a round or flat rod known as a beam or trammel bar. Two sliding heads are attached to its beam and can be set at any place by a screw, fixed with a head.
Different types of points or parts can be attached to the head to use in different ways such as inner and outer measurement drawing circles or drilled jobs etc.
A good trammel has marked in inches and millimeters with its fraction. Some of the trammels have one sliding head with the fine adjusting carrier so that, it can also be made the fine adjustment. These are normally available in 15 to 50 cm.
What is Jenny Caliper? Types of Jenny Caliper on Marking Tool. ITI fitter marking tools
These calipers are also known as hermaphrodite calipers or odd-leg calipers. Jenny calipers have one leg with an adjustable divider point, while the other is a bent leg. The legs are joined together to make a firm joint. Jenny calipers are used for marking and layout work. It is mostly used in drawing parallel lines and finding out the center of cylindrical jobs.
Calipers are available with the usual bent leg or with a heel. Calipers, with ordinary bent legs, are used for drawing lines parallel along an inside edge and the heel type is used for drawing parallel lines along outer edges. On this basis, Jenny Caliper is divided into two categories.
(i) Bent Leg Type Jenny Caliper
It is further of two types.
(a) Fixed Point Jenny Caliper
The length of both legs is fixed and cannot be increased or decreased according to the need. The straight leg of the divider is used for marking purposes and the bent leg.
(b) Adjustable Point Jenny Caliper
The length of a straight pointed leg can be increased or decreased according to need. Variation in the length is done with the help of the pointed part of the leg which is tightened with screw and nut to the leg.
When we want to increase or decrease the length of legs, then lose the screw and the pointed leg can move up and down.
(ii) Heel Type Jenny Caliper
With the help of a heel-type Jenny caliper, we can draw parallel lines on the outer surface of the job.
Uses of Jenny Calipers
Jenny calipers are used for the following objectives.
(1) For marking lines parallel to inside and outside edges.
(ii) Locating the center of round bars.
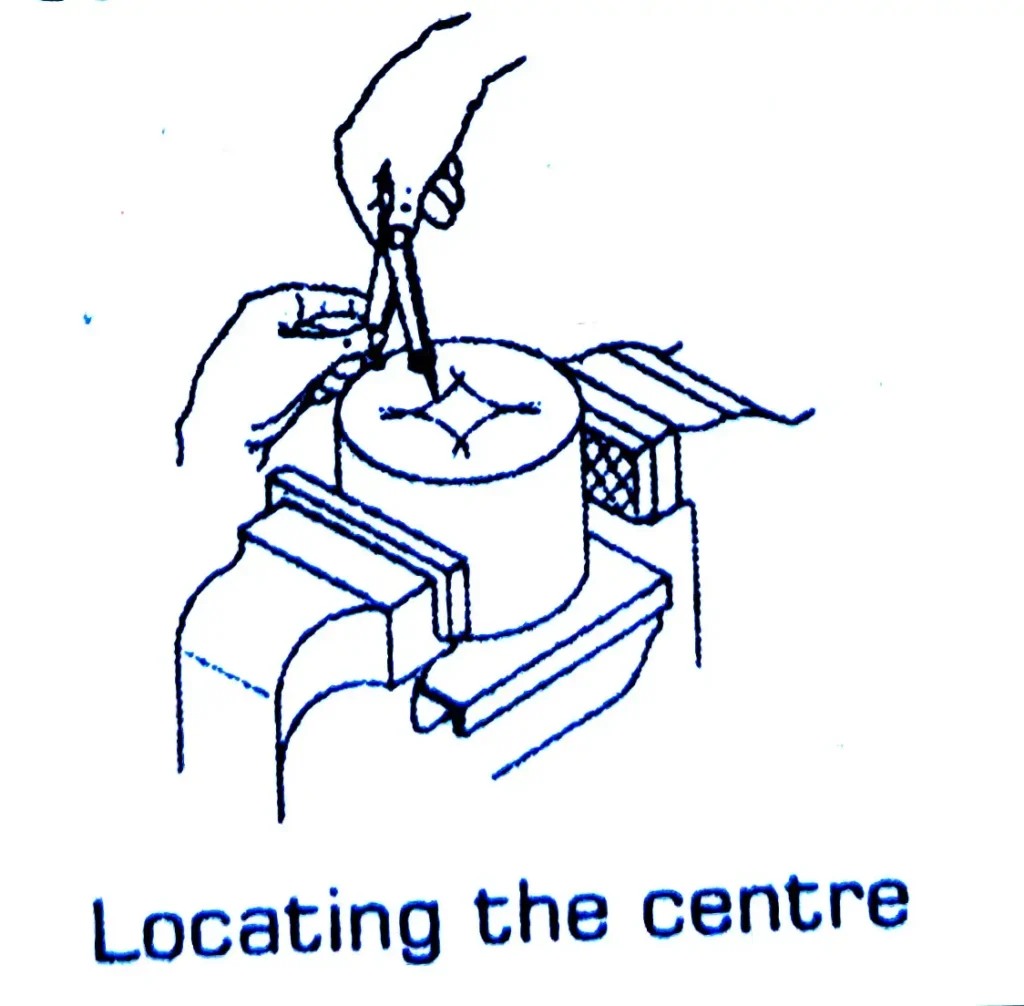
(iii) Jenny caliper can also be used for scribing lines along curved edges. While setting dimensions and scribing lines, both legs should be of equal length.
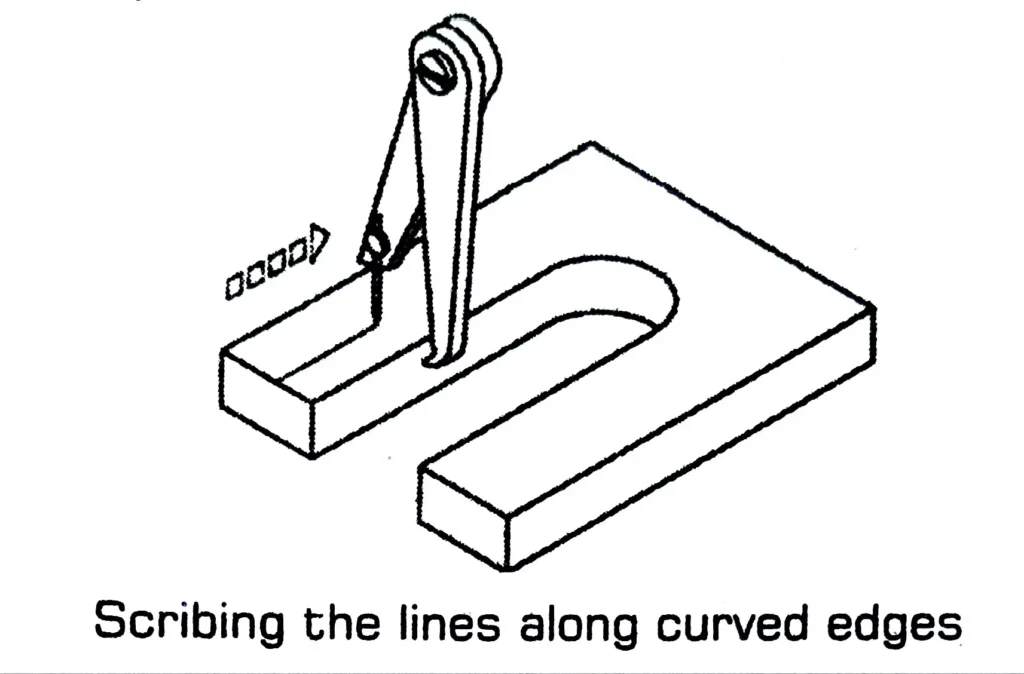
(iv) The Jenny caliper should be slightly inclined while scribing lines.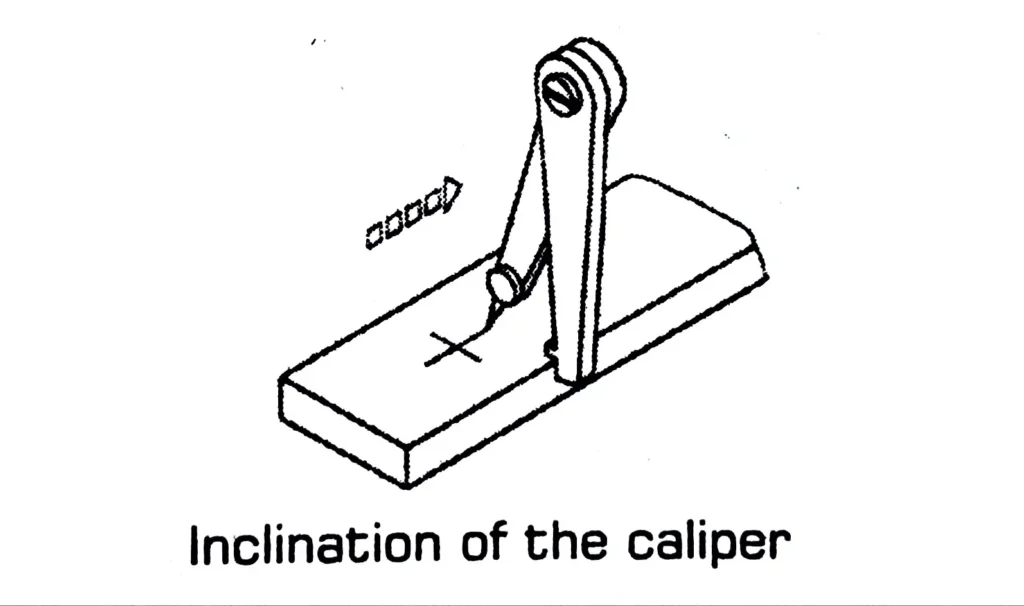
(v) While setting dimensions for accurate setting, the Jenny caliper point should click into the graduation.
What is a Scratch Gauge? Uses of Scratch Gauge on Marking Tool, Best of workshop.
It is a marking tool in a workshop consisting of a beam, a headstock, and an ascribing implement. It has a cast iron beam of 15 cm in length.
The headstock slides along the beam and is locked in place with the help of a locking screw. The marking implement is fixed to one end of the beam. It is used for making a parallel line to a straight edge.